
As an Amazon Associate, I earn from qualifying purchases. In addition, I participate in several other affiliate programs that allow me to earn while I recommend products I love.
These heart cookies are the perfect Valentine’s Day treat, or just a great way to show someone you care. Made with soft sugar cookie base and royal icing, you can’t go wrong with these expressions of love.
Heart cookies can be used in so many situations.
Birthdays, anniversaries, weddings, Valentine’s Day.
The list is endless.
But decorating your own heart sugar cookies with royal icing is really going the extra mile and lets you personalize the cookie with names, colors, dates, or anything else you want to put on it.
I love these decorated heart shaped cookies because they’re a great way to learn about royal icing as they aren’t intricate and don’t require lots of small details to make them look good.
In this tutorial for heart cookies, I’m going to walk you step by step through what you will need, how to make them, and how to decorate these heart cookies.
These heart cookies are:
- easy to make even if you’re a beginner
- delicious with no crumbling
- great as a gift
- fun to make with kids
What You’ll Need to Make Decorated Heart Cookies
The heart cookies are made with the cut-out sugar cookie base and royal icing, which we’ll talk about in a minute.
The sugar cookie cut-out recipe was developed to ensure that the cookies wouldn’t spread in the oven and would hold their shape.
You don’t want a traditional sugar cookie recipe for this that will spread in the oven, as you would then have a bunch of blob cookies instead of the shapes you intended.
You also need these awesome heart cookie cutters.
Follow the recipe for the sugar cookies, but know that you will need: powdered sugar, granulated sugar, flour, vanilla extract, butter, baking powder, salt, and eggs.
For the royal icing recipe, you will need vanilla extract, powdered sugar, meringue powder and water.
I prefer to use meringue powder for my royal icing recipes, as it’s easier to store and safe for consumption for everyone.
As for the tools and colors you’ll need, I recommend:
- red food coloring – gel food coloring like this is better than liquid coloring
- piping bags – I prefer this brand
- a scribe or toothpick for detail work – I use these
- heart cookie cutter – I use these

How Do I Store Heart Cookies?
You don’t have to worry about freezing or refrigerating your finished heart cookies.
Put the cookies in an airtight container like this and they’ll last for 2 weeks at room temperature.
If you do want to make them earlier than that for a large gathering, you can freeze the cookies once you bake them, but don’t freeze the cookies with the royal icing decorations as the royal icing doesn’t always freeze well, and the chances you’ll damage the frosting are high.
Can I Substitute Ingredients in Heart Cookies?
I don’t recommend substituting anything in these cookies or royal icing if you want to make the cookie recipe keto or low calorie or whatever dietary requirement you need.
Baking is such a science that you can change one ingredient and mess up the entire recipe.
I’ve added too much butter or not enough flour or too much flour plenty of times with detrimental results.
Instead, use a recipe that is already geared towards your dietary requirement so you know it’s been tested.
How to Make Heart Cookies
First things first, you’re going to need to make the actual hearts!
Using the cut-out sugar cookie recipe is going to be the best way to make cookies that won’t spread and will keep their shape.
Make sure to put things together in the right order, so creaming the butter and sugars in a separate bowl, adding in the eggs and vanilla, and then adding in the flour mixture.
If you try to add it all at once because you’re impatient, it won’t work as the science of baking means there are specific reasons for adding things at certain times.
Once in the oven, keep a close eye on them.
I take them out at about 8 minutes, or right as they are turning slightly golden brown.
The cookies shouldn’t look like raw dough, but they can definitely look just barely turning golden as that will give you a softer final cookie.
You want to leave them on the baking sheet for 5 to 10 minutes to harden up and then transfer them to a cooling rack.
How to Make Royal Icing for Heart Cookies
Royal icing is the key ingredient to making your cookies smooth and shiny, and even if you’re a beginner, heart cookies are a great way to learn how to work with royal icing.
Royal icing is good to use as you can color it any color you want and it comes out soft and liquidy but dries hard so the cookies are easier to transport and keep looking great.
The royal icing recipe takes you through the steps to make royal icing, but there are two ways you can go about the final product before you decorate.
Firstly, you can create two different consistencies of icing, a stiff icing for “outlining” and a thinner icing (thinned out with water) to “flood” or fill in the outline with.
This is the method that was used to create the cookies in these pictures, and this is good if you want to learn as using stiff icing helps to keep everything together and not overflowing.
However, you don’t need to use two different consistencies if you don’t want to.
You can just use one consistency, somewhere in the middle, and both outline and flood with it.
This creates a smoother edge and obviously means you don’t have to deal with two different consistencies of the same color.
Whichever you use, you can figure out the consistencies by counting the seconds it takes for the line to disappear if you drag a knife through the icing.
For the one consistency, I like 10-12 seconds, but if you’re doing a “flood” and an “outline” icing, stick to about 8 seconds for a flood and 15 to 18 seconds for the outline.
The stiffer icing should resemble something like toothpaste, while the flood is more like honey.
I use tipless piping bags to pipe, so you just put the icing in the bag and then cut off however much you want for the tip (start small).
And then you’re ready to go!
How to Decorate Heart Cookies with Royal Icing

The fun part about doing heart cookies with royal icing is that you can do so many things with it.
If you want to keep it simple, simple outline the heart in one color icing and then flood it with the same color.
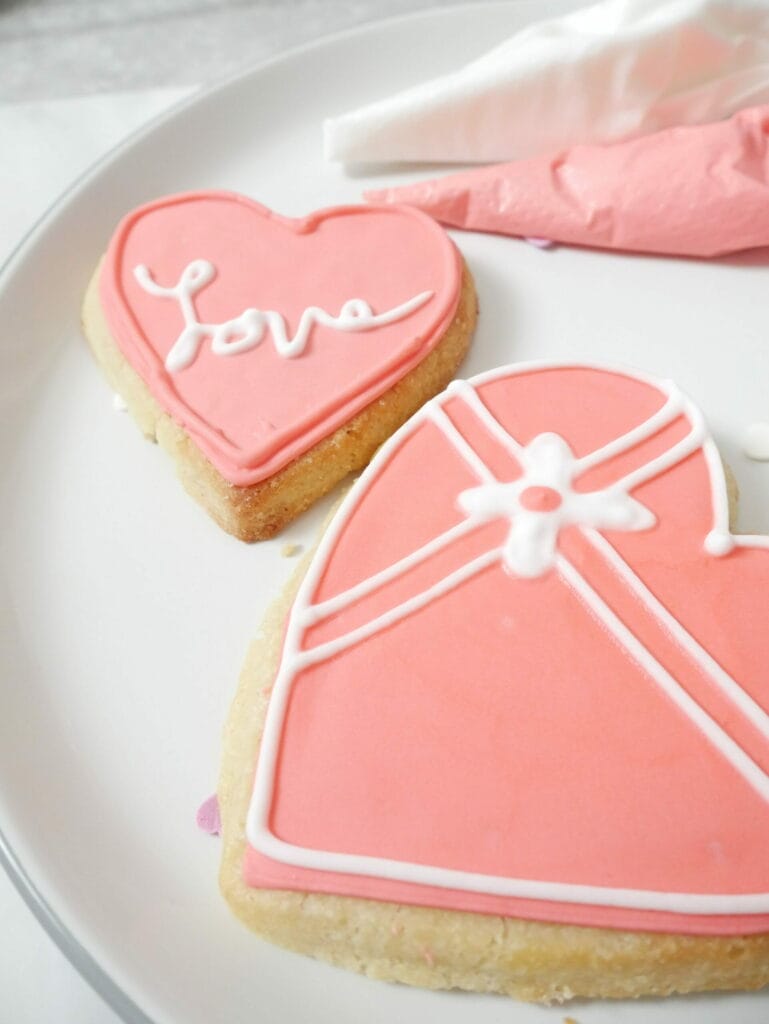
You can leave it smooth, or you can add details on top like writing the word “Love” or adding a border after it’s dry.
Other options include making a bow and present-look of sorts.
Get creative with it!
The one thing to remember with royal icing is that you need to let each “level” dry before moving onto the next.
So if you do the base in red, but then want to add letting of “Love” on top of it, you need to let it dry for at least 20-30 minutes.
You can use the “wet on wet” technique which is where you put wet icing on wet icing, but that creates a less defined pattern (which is what you want sometimes, like if you want polka dots).
But only do this on purpose, not because you’re too lazy to wait for the base layer to dry before adding detail.
You’ll just end up with a mushy mess of icing.
And there you have it!
How to make heart cookies and decorate them with royal icing.
Your next gift to your loved ones just got a whole lot sweeter!