
As an Amazon Associate, I earn from qualifying purchases. In addition, I participate in several other affiliate programs that allow me to earn while I recommend products I love.
These beach ball cookies are super cute and perfect for summer cookies. They are also really easy to decorate, which means you can practice your royal icing skills by making beach ball cookies.
Beach balls are such an integral part of summer for so many, whether you’re playing pool volleyball or you’re at the actual beach with your beach ball!
I love these beach ball cookies because they use an easy-to-find cookie cutter, just a circle (or you can use the top of a glass), and you can choose any colors you want without worrying if it’s “true to life” because beach balls can be all colors!
In this tutorial for beach ball cookies, I’m going to walk you step by step through what you will need, how to make them, and how to decorate these beach ball cookies.

These beach ball cookies are:
- cute and fun
- great for summer
- delicious without any crumbling
- easy to make for royal icing beginners
What You’ll Need to Make Decorated Beach Ball Cookies
Making beach ball cookies means you’re going to need some ingredients!
For the sugar cookie dough, you’ll want: granulated sugar, powdered sugar, butter, eggs, vanilla extract, salt, baking powder, and flour.
You’ll also need to make the royal icing, which I do using meringue powder, water, powdered sugar and vanilla extract.
As for the tools and colors you’ll need, I recommend:
- any color food coloring you want, I use gel ones like these
- edible food marker – this is the best one
- piping bags – I use these as the best brand
- a scribe or toothpick – this is the best one
- circle cookie cutter
How Do I Store Beach Ball Cookies?

Beach ball cookies made with royal icing are super easy to store.
You don’t need to put them in the fridge or freeze them, all you need to do is store them at room temperature in an airtight container for 2-3 weeks.
If you do want to make them ahead of time, you can freeze the actual cookie bases, but once you’ve decorated it with the icing, freezing may cause problems with the royal icing.
Can I Substitute Ingredients in Beach Ball Cookies
Everything in these recipes is created due to the science of baking.
You can’t deviate from the recipe and expect the same results.
For some people, this is fine – they know that they like their cookies with a bit less flour or they like to bake them for a shorter amount of time.
If you’re not an experienced baker, don’t substitute anything in these recipes.
If you’re looking for substitutions for dietary reasons, you’d be much better suited looking or a recipe that was geared towards your requirement and then using the watermelon cookie decorating tutorial below.
How to Make Beach Ball Cookies
The first thing you need to do before you make the actual beach ball cookies is to make the bases!
These will be the bases we use to decorate on and we want them to be sturdy and flat, so we use a cut-out sugar cookie recipe.
The reason for using a cut-out sugar cookie recipe instead of any sugar cookie recipe is because these types of recipes are especially formulated to keep the cookie together and not spread in the oven.
If the sides of your cookie spread, soon you’re left with a blob of cookies and not necessarily the shape that you put in there.
Follow the recipe exactly, including creaming the butter and sugars first, adding in the flour slowly, and kneading the dough on the counter if you find that it needs a bit of extra work to get mixed together.
Use a circle cookie cutter to cut out shapes once you’ve rolled the dough, making sure to flour the edges of the cookie cutter so you get a clean cut.
Bake until the sides are just lightly golden.
I prefer my cookies on the softer side, so I do this instead of letting them get brown all the way around.
Cookies harden when they finally cool, and if they look perfectly done in the oven, they’ll bake further and go past done.
How to Make Royal Icing for Beach Ball Cookies
The component of the cookies that make it all come together, the royal icing, is important to play around with and get right to make sure you have a smooth finish!
Royal icing can be intimidating to new bakers, as it’s not as easy as buttercream to just slather on, but I guarantee you that it is really actually easy to make and once you practice a few times, you’ll be good to go.
You can also always make it thicker with powdered sugar or thinner with water so you can’t really ruin a batch of it.
Use my royal icing recipe to create the icing for this recipe.
I use 12 second consistency icing for this, which means that if you drag a knife through the icing, it takes about 12 seconds for the line to disappear.
You can also do two consistencies, a thicker one for the “outline” and a thinner one for the “flood,” but I prefer the look of a single consistency better and it’s way faster to use.
When you’ve got the royal icing how you want it, separate it out into bowls to add the food coloring and then put it in piping bags.
I use tipless piping bags and just cut the end off instead of using different tips, but if you have a thin tip, you can use that too.
How to Decorate Beach Ball Cookies with Royal Icing
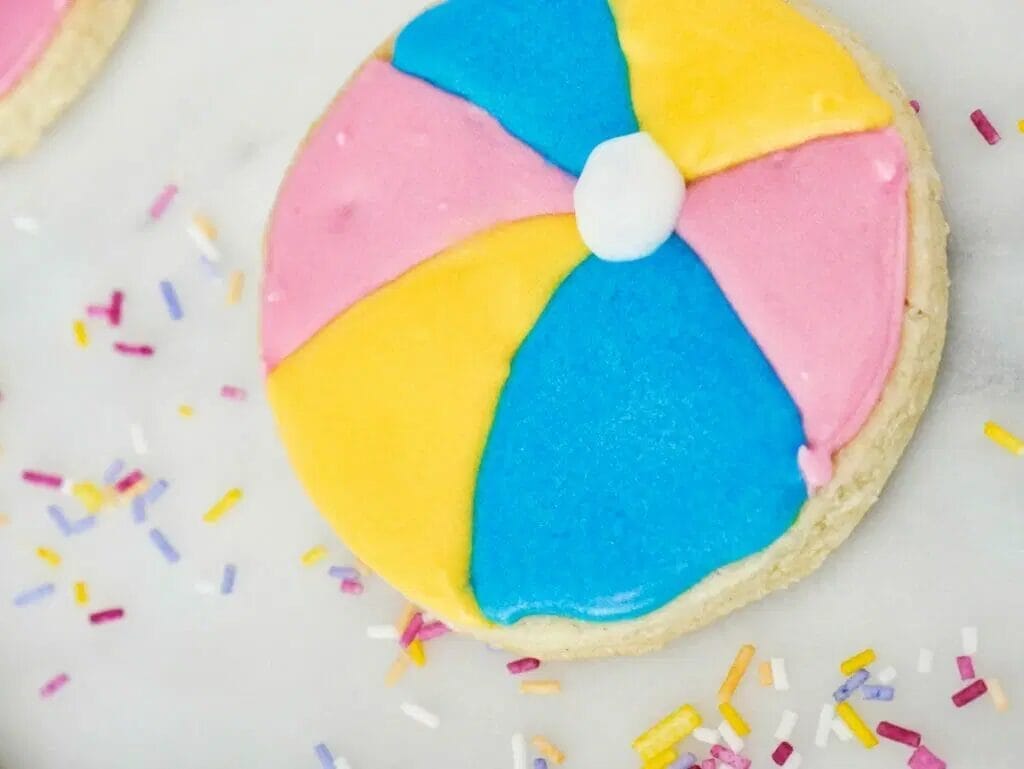
The first thing you need to do is to use an edible food marker to draw on your cookie.

Right now you’re creating six different sections in wedges, but you don’t want to make them equal wedges like a pizza.
Follow the guide below for where to draw your lines.
Then, choose as many colors as you want, from 1 to 6.
I chose 3 different ones to have 2 sections of each color.
Outline two sections with the same color.
I opted to do the two sections opposite from each other.
Flood them in with the same color.
Let dry for at least 30 minutes, but ideally up to an hour, then outline and flood the next two sections with the next color.
Let dry again and flood the final sections with your final color.
When that is dry, use white icing to draw and flood a circle on top of where all of the section join up to create the top of your beach ball.
And there you have it!
A summer beach ball cookie worthy of both playing with and eating!